Automated model-driven Power App tests using Playwright

Ryan Spain
Automating user interface tests can save a lot of time. They can reduce the number of manual regression tests that need to be performed when changes are made to a solution.
There are a couple of different automated testing tools that can be used to test a model-driven Power Apps UI, but for this exploratory post, I’ll be using Playwright from Microsoft and automating the execution of these tests using Azure Pipelines.
ℹ️ Note
This original idea for this post came to me after this post from MVP Joe Gill on the topic of Playwright with Power Apps. I’ll be taking this a step further by executing the tests using Azure Pipelines.
🎯 Goal
I’ve never used Playwright before, and so, I’ll be authoring this post as I complete out the process. So, to get started, let me set out some broad goals and requirements to achieve:
- Install Playwright locally
- Create a basic test. i.e. create a contact
- Run tests locally
- Run tests from Azure Pipelines
Step 1️: Install Playwright locally
First, lets initialize a project from a new folder on your machine. You can execute the following commands from your favourite Windows command line.
Creating a project folder
Create the folder and navigate into it.
mkdir power-apps-testscd power-apps-testsInitializing a new project
Using npm, initialize a new project. You’ll be asked for some general information about the project after you execute this command but you need only provide the name.
npm initAdding the Playwright dependency
npm install -D @playwright/test 💡 Tip
The -D flag is shorthand for --save-dev which denotes that this package is a development dependency. See here for what that means for the projects dependency structure.
Install supported browsers
You can optionally install only selected browsers for running tests, but based on my interpretation of the documentation, it’s best the use the browsers supported by Playwright instead of relying on the ones installed on your machine (or the machine running the tests).
npx playwright install The above command will take a little while to run at first while it downloads the latest supported browsers that Playwright supports.
Your project directory should now resemble the below.
📁node_modules
📄package-lock.json
📄package.json
The package.json file should have a single dev dependency of @playwright/test.
Add a setup script to install supported browsers
Instead of running npx playwright install each time the tests need to be run on a new machine, I prefer to add this to a new script in package.json. That way, I can just tell a consumer of the tests to simply run npm run setup to setup the local machine. Add the same script to your package.json file too.
{
  ...
  "scripts": {
    "setup": "npx playwright install"
  }
  ...
}
Step 2️: Create a basic test
Opening a model-driven Power App should be simple, right? I just need to instruct the test to navigate to the apps URL, right?
Thankfully the syntax in Playwright is relatively straight forward. Create a test directory and file called tests/app.spec.js under the project directory and add the below code to it (while replacing the config.appUrl and config.appName with your own);
const { test, expect } = require('@playwright/test');

let config = {
  appUrl: 'YOUR_APP_URL',
  appName: 'YOUR_APP_NAME'
};

test('open app', async ({ page }) => {
  await page.goto(config.appUrl);
  await expect(page.locator(`text=${config.appName}`).first()).toBeVisible();
});
The test is simply navigating to the app by URL, and checking to see if a text element is visible on the page with the exact name of the app.
Step 3️: Run tests locally
Tests can be run using npx playwright test from the project directory. But instead, I like to update the test script in the package.json file to invoke this for me.
There should already be a test script in your package.json, but it likely won’t have anything useful in it! I recommend updating it to resemble the below. This way, you only need to run npm run test to execute tests.
{
  ...
  "scripts": {
    "setup": "npx playwright install",
    "test": "npx playwright test",
  }
  ...
}
Once you have this script in place, run npm run test to kick off the tests.
The test fails! According to the console output, the error is being thrown when trying to find our app name on the page. I’m pretty sure the app name is displayed, so lets debug this test by running it interactively. That is, running it in a non-headless state.
👀 Run the test in a non-headless state
To instruct Playwright to open a browser when running tests, we can configure some options in a playwright.config.js file that should be placed in the project directory. Create the config file and copy the below code into it.
/** @type {import('@playwright/test').PlaywrightTestConfig} **/
const config = {
  use: {
    headless: false
  },
};

module.exports = config;
We are setting the headless property to false. There is a lot more we can do in this configuration based on the documentation which I am sure will surface later.
💡 Tip
The first line of config file is a JSDoc comment that gives us some useful intellisense when completing out the configuration. The comment is simply instructing our IDE (VS Code in my case) where to find type information for the configuration objects.
After making these changes, we run the test again using npm run test to see that the real issue here is that we are not signed in!
🔐 Handling sign in/authentication
The simplest way of handling sign in is providing the email and password for a user that doesn’t have multi-factor authentication (MFA) setup on their account. To do this, I just added some steps in my test to fill in the email and password inputs on the sign in screen, and click the default submit buttons to progress through the sign in flow. The latest test code is below:
⛔ Warning
You should use other methods of protecting user accounts where multi-factor authentication is turned off to support scenarios like described here. Such methods include IP address restrictions. i.e. the IP address of the continuous integration server, and your local network for testing.
const { test, expect } = require('@playwright/test');

let config = {
	appUrl: 'YOUR_APP_URL',
	appName: 'YOUR_APP_NAME',
	signInUrl: 'https://portal.office.com/',
	username: 'YOUR_USERNAME',
	password: 'YOUR_PASSWORD'
};

test('open app', async ({ page }) => {
	// Open the sign in URL
	await page.goto(config.signInUrl);

	// Complete sign in flow
	await page.fill('input[name="loginfmt"]', config.username);
	await page.click('input[value=Next]');

	await page.fill('input[name="passwd"]', config.password);
	await page.click('input[value="Sign in"]');
	await page.waitForNavigation();

	// Open the app
	await page.goto(config.appUrl);
	await page.waitForNavigation();

	// Look for the app name
	await expect(page.locator(`text=${config.appName}`).first()).toBeVisible();
});
💡 Tip
You can use the code generation feature of Playwright to write the JavaScript test code for you. Simply run npx playwright codegen <START_URL> where <START_URL> is the first page to load as part of your test. See the documentation for more on how test code generation works.
The end result, again after running npm run test, is roughly similar to the below. You can see that right at the end of the test, the app name in the upper left corner is being highlighted as part of the test assertion.
♻️ Reusing the sign in code across multiple tests
It doesn’t make much sense to keep repeat the sign in credentials and steps in each test, so I will show a way of reusing the sign code such that it will run before each test. Simply wrap the sign in code using the test.beforeEach Playwright API as below.
const { test, expect } = require('@playwright/test');

let config = {
	appUrl: 'YOUR_APP_URL',
	appName: 'YOUR_APP_NAME',
	signInUrl: 'https://portal.office.com/',
	username: 'YOUR_USERNAME',
	password: 'YOUR_PASSWORD'
};

test.beforeEach(async ({ page }) => {
	// Open the sign in URL
	await page.goto(config.signInUrl);

	// Complete sign in flow
	await page.fill('input[name="loginfmt"]', config.username);
	await page.click('input[value=Next]');

	await page.fill('input[name="passwd"]', config.password);
	await page.click('input[value="Sign in"]');
	await page.waitForNavigation();
});

test('open app', async ({ page }) => {
	...
});

test('create a contact', async ({ page }) => {
	...
});
Now, before each of the tests run, the sign in will happen just before it. While this doesn’t save any time off running the tests, but it does same time authoring the tests.
➕ Testing the creation of a contact
So far, I’ve just tested opening a model-driven app. But to take things further, I’ll write a test to create a new contact and verify it was created successfully. My test flow will look something like below:
- Open the Contacts area of the app from the sitemap
- Click on the New button in the command bar
- Provide First Name and Last Name on the contact form
- Click on the Save button in the command bar
- Check if the next form contains the contacts ID
Below is the working test for this scenario with each area of the code annotated using the steps from above.
test('create a contact', async ({ page }) => {
	// Open the contacts area from the sitemap
	await page.goto(config.appUrl);
	await page.waitForNavigation(),
	await page.click('text=Contacts');
	await page.waitForNavigation(),

	// Click on the New button in the command bar
	await page.click('[aria-label="New"]')
	await page.waitForNavigation(),

	// Complete some details on the contact form
	await page.fill('[aria-label="First Name"]', 'Test');
	await page.fill('[aria-label="Last Name"]', `Contact (${Date.now()})`);

	// Click on the Save button in the command bar
	await page.click('[aria-label="Save (CTRL+S)"]')
	await page.waitForNavigation(),

	// Check if the next form contains the contacts ID
	await page.waitForFunction('Xrm.Utility.getPageContext().input.entityId !== null');
});
Three things worth noting from how this test looks:
- The test is arguably quite fragile. This is because of the use of aria-label element attributes for selection. If the sitemap, form, or command bar labels change, the test is broken!
- I’m using a timestamp in the contacts last name to keep it unique. This is to avoid any issues with any duplicate detection rules that might be enabled in the environment.
- To retrieve the contacts ID after the form is saved, we make us of the page.waitForFunction Playwright API to invoke a Power Apps client API. Specifically, we are using the Xrm.Utility.getPageContext() API to get the current pages record ID.
The test, when run, should produce something similar to below:
Step 4️: Run tests from Azure Pipelines
To run the tests on a build server, I need to install the Playwright browsers using npm run setup created earlier, then run npm run test from the projects directory to execute the tests. I probably should parameterize some of the tests such as to not check-in user credentials or environment specific details to source control.
🆎 Parameterize the tests
Parameterized tests mean we can pass in sensitive credentials at the time of execution, and also target tests against multiple environments (UAT, pre-production, etc.).
According to this GitHub issue, the best way to parameterize tests on a continuous integration server is using environment variables. The environment variables need be set before the tests are run, and we need to use a special syntax in the test code to access the set environment variables. So in summary:
- Set environment variables using set FOO=BAR syntax in the command line
- Access the set environment variables in the tests using syntax like process.env.FOO
- Invoke the tests like normal using npm run test
But what about running the tests locally when they are being drafted? I don’t like the idea of having to set a bunch of environment variables to run the tests locally, so I came up with a simple solution.
First, I made a file called local.powerapps.config.js in the root directory to store the test configuration that should not be checked into source control (Remember to add this file to your .gitignore).
let config = {
  appUrl: 'YOUR_APP_URL',
  appName: 'YOUR_APP_NAME',
  signInUrl: 'https://portal.office.com/',
  username: 'YOUR_USERNAME',
  password: 'YOUR_PASSWORD'
};

module.exports = config;
Next, I made another config file called powerapps.config.js in the same directory that by default looked for the test configuration in the environment variables. There’s also a condition that if the environment variable of TEST_MODE was set to local, it would override the config object with the config stored our local.powerapps.config.js file.
let config = {
  appUrl: process.env.APP_URL,
  appName: process.env.APP_NAME,
  signInUrl: process.env.SIGN_IN_URL,
  username: process.env.USERNAME,
  password: process.env.PASSWORD
};

if(process.env.TEST_MODE === 'local')
  config = require('./local.powerapps.config');

module.exports = config;
Finally, to run tests in local mode, I added a new test-local script to the package.json as below to set this TEST_MODE environment variable to local.
{
  ...
  "scripts": {
    "setup": "npx playwright install",
    "test": "npx playwright test",
    "test-local": "set TEST_MODE=local&& npx playwright test"
  }
  ...
}
Now, running tests locally on my machine is done using npm run test-local, and from the build server, npm run test can be used - assuming all other prerequisites have been met (Installing NPM packages, and Playwright browsers).
📷 Save test execution screenshots and videos
When we eventually run the tests from the Azure Pipeline, we lose the ability to see the test executing in front of us. While the test is configured to run in a non-headless state as outline earlier, no-one is around to see that!
While we cannot look at the test executing live, we can save the execution screenshots and videos by simply updating our playwright.config.js file to switch on the screenshot and video options as below. After doing so, a new test-results folder will contain updated screenshots/videos after each test execution. We’ll publish this test-results folder as a pipeline artifact so it can be looked at after a test fails.
/** @type {import('@playwright/test').PlaywrightTestConfig} **/
const config = {
  use: {
    headless: false,
    screenshot: 'on',
    video: 'on'
  },
};

module.exports = config;
🔮 Create the Azure DevOps build pipeline
There are 6 steps to follow to get the pipeline up and running.
- Create a pipeline using the classic editor
- Add pipeline variables (Credentials and app details)
- Install NPM packages and Playwright browsers
- Set environment variables for the test execution
- Execute the tests
- Publish the test results
1. Create a pipeline using the classic editor
The option to use the classic editor appears when creating a new pipeline.
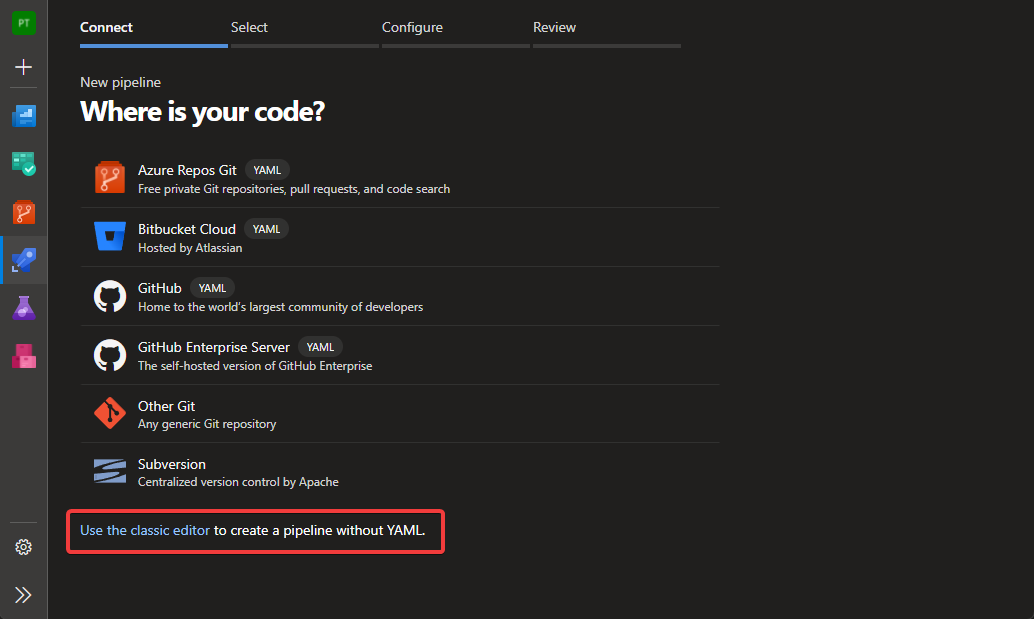
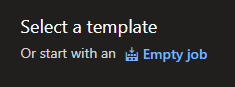
After selecting where your code is hosted, you need to chose the Empty job option from the template pane.
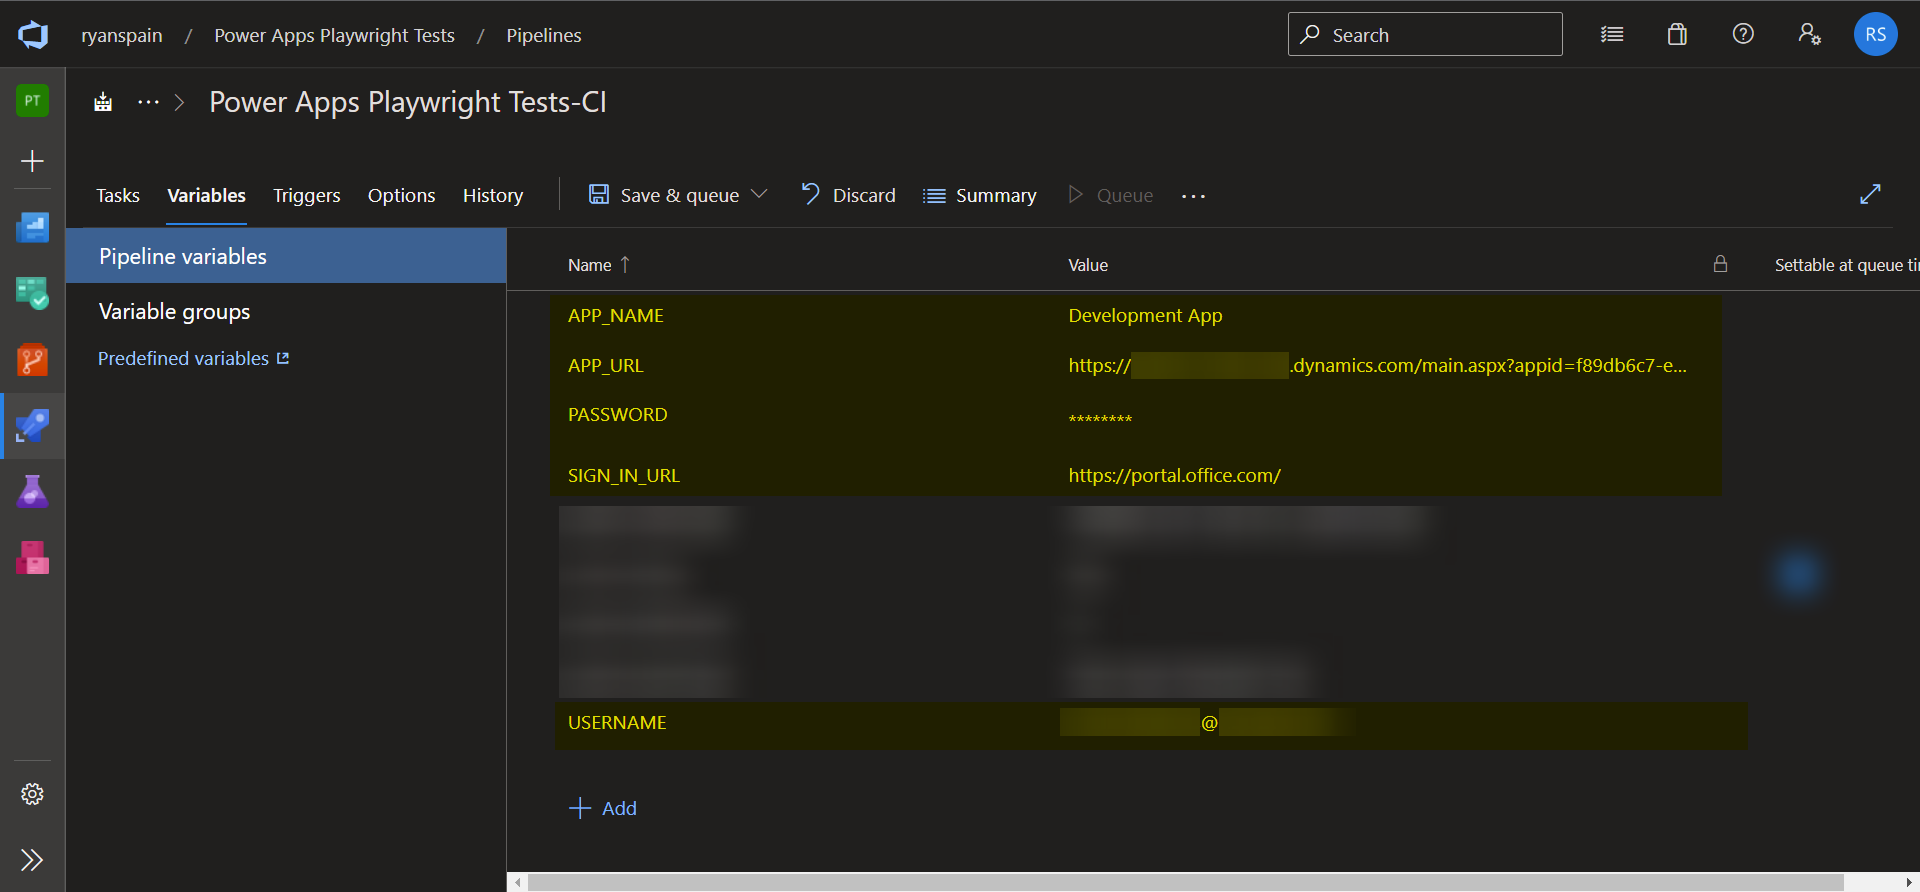
2. Add pipeline variables (Credentials and app details)
Under the Variables tab of the pipeline, we need to add the following highlighted pipeline variables that correspond to environment variables that our powerapps.config.js file uses.
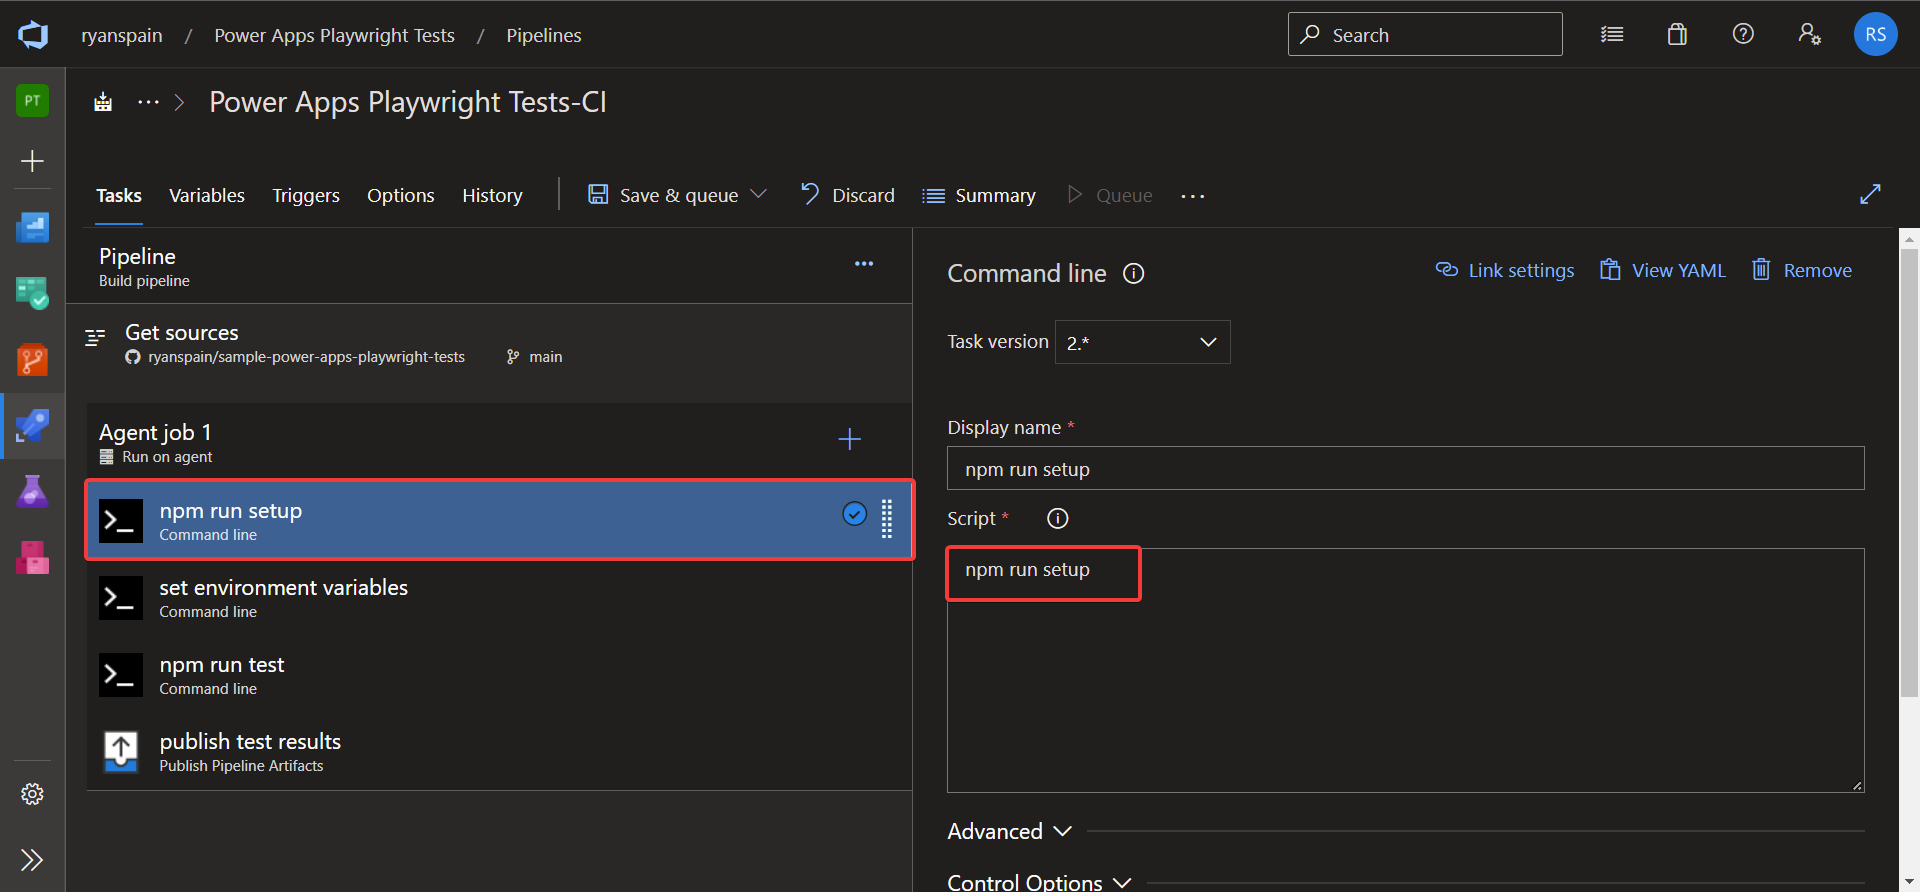
3. Install NPM packages and Playwright browsers
To setup our test environment locally, we call our custom npm run setup script in the package.json file that takes care of installing NPM packages and the required Playwright browsers. We can call this same command from the pipeline by adding a command line tasks as below.
4. Set environment variables for the test execution
Next, we set the local environment variables of the pipeline agent to the pipeline variables we provided earlier. This is done through the command line also as below.
💡 Tip
The $(APP_URL) syntax is how we access pipeline variables in Azure Pipelines. See the Use predefined variables documentation page for more information on this syntax.
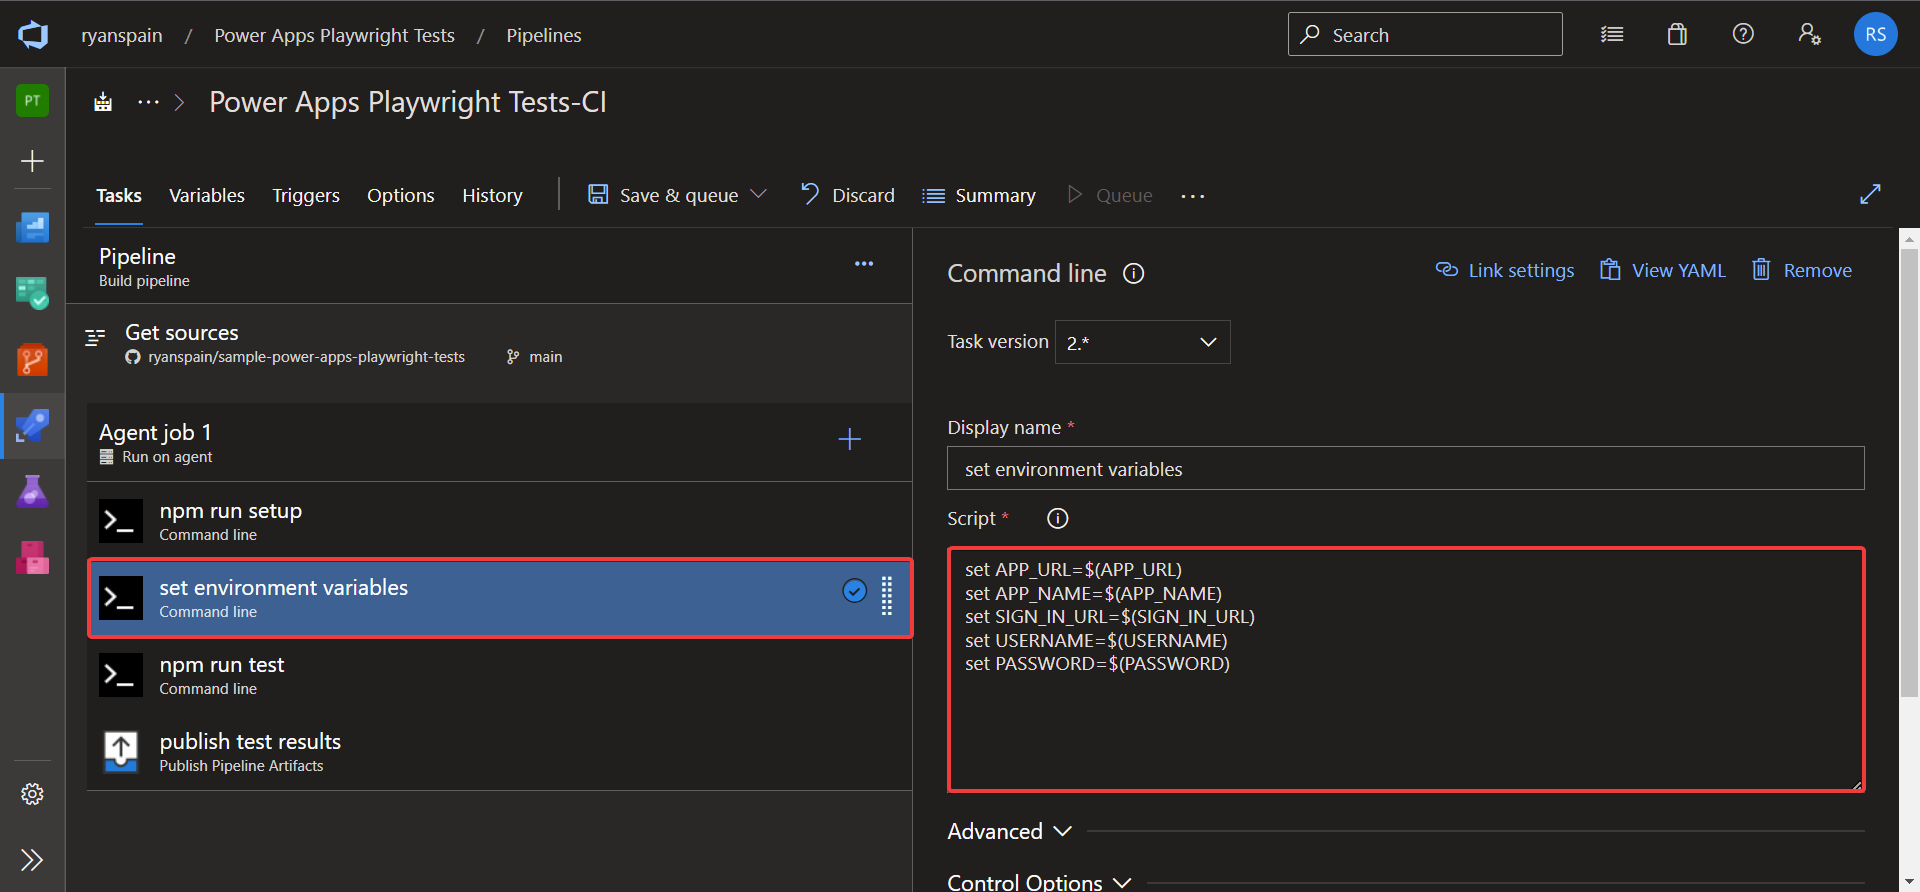
Here’s the script I used in the pipeline task above if you’d like to copy and paste it into your own pipeline.
set APP_URL=$(APP_URL)
set APP_NAME=$(APP_NAME)
set SIGN_IN_URL=$(SIGN_IN_URL)
set USERNAME=$(USERNAME)
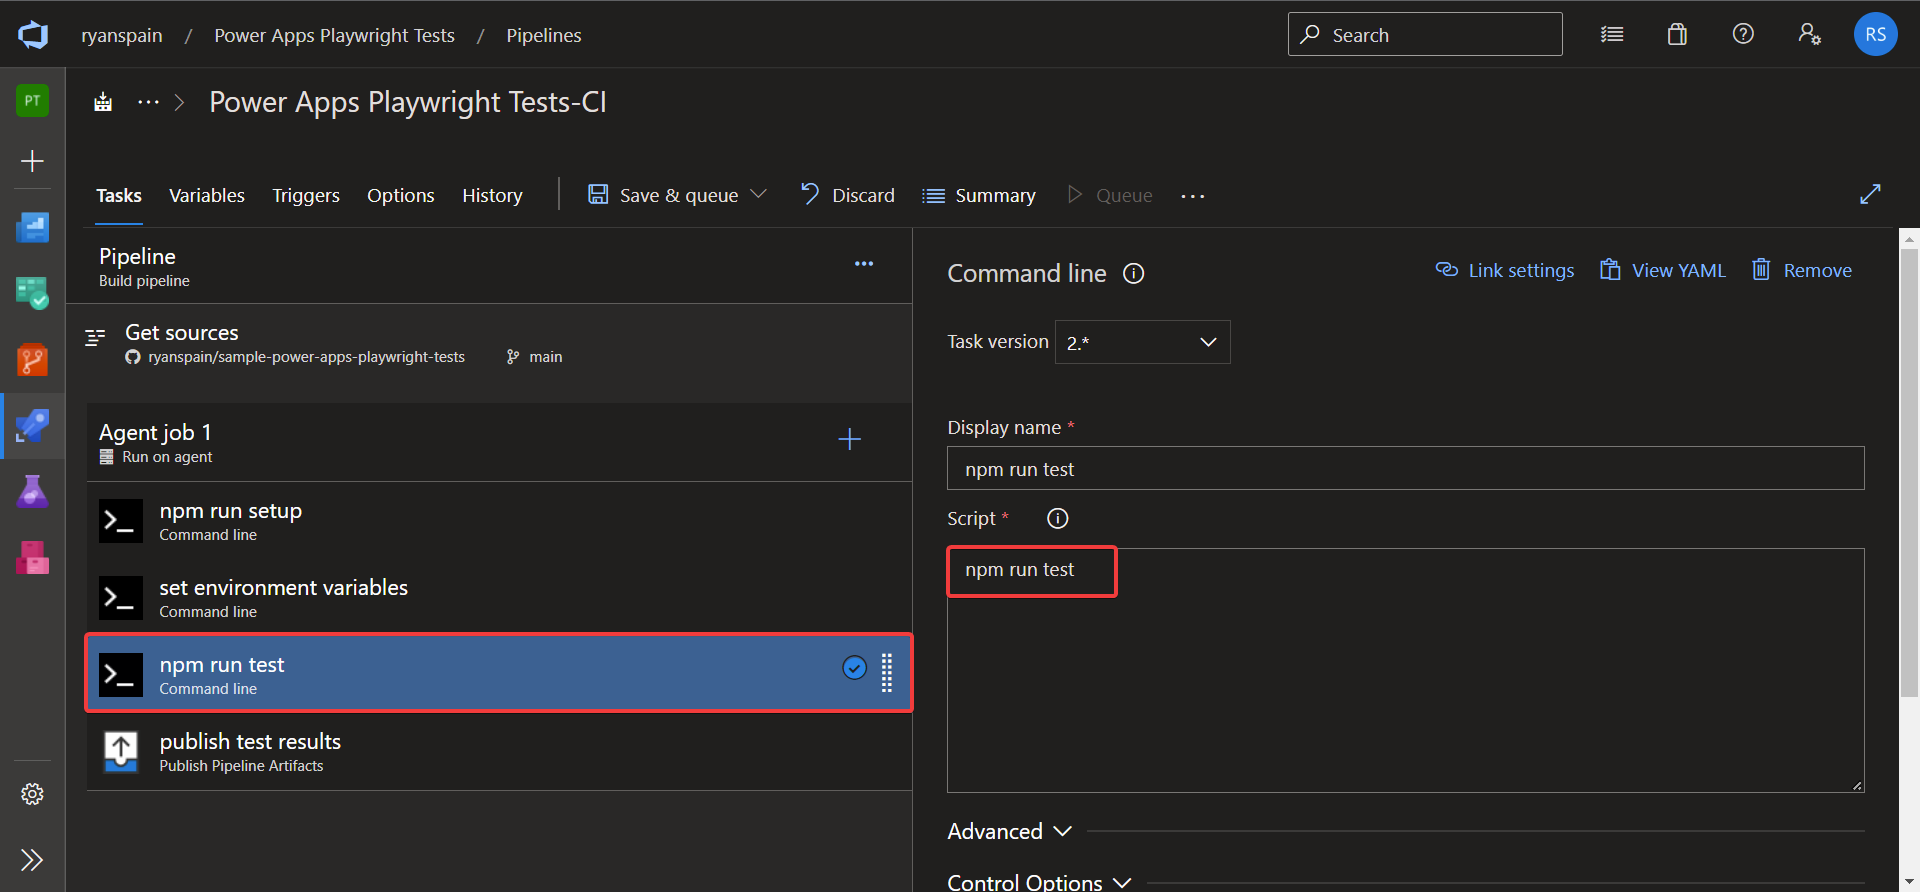
set PASSWORD=$(PASSWORD)5. Execute the tests
We simply call npm run test to execute the tests as below in the command line task I added to the pipeline.
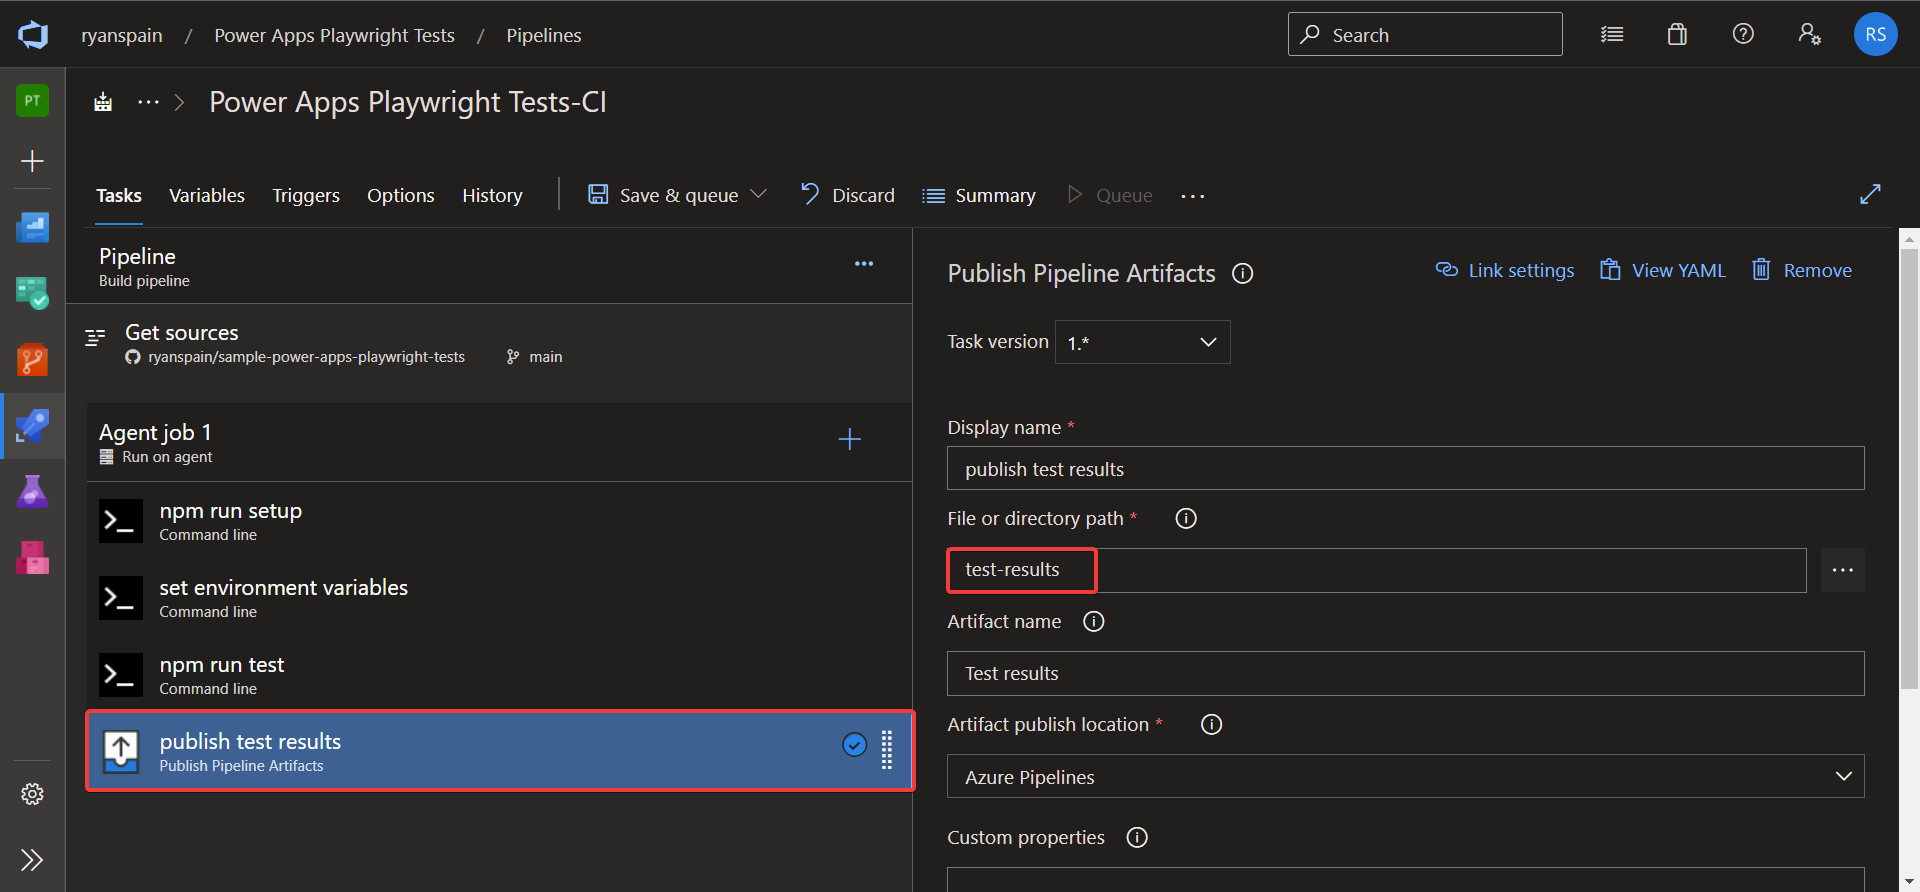
6. Publish the test results
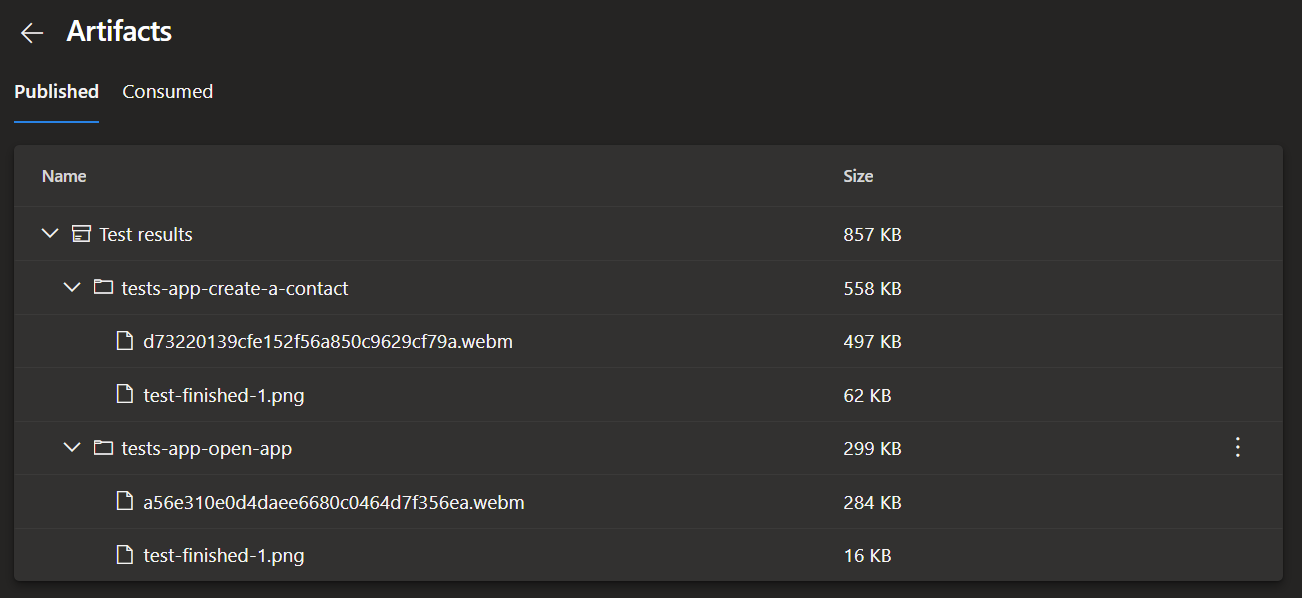
The final optional step is to to publish the test results. Test results include screenshots and videos of the tests being executed and can be helpful in debugging why a test failed. They are located in the test-results folder we talked about earlier.
Once published, test results are available as an artifact on the pipeline history as below.
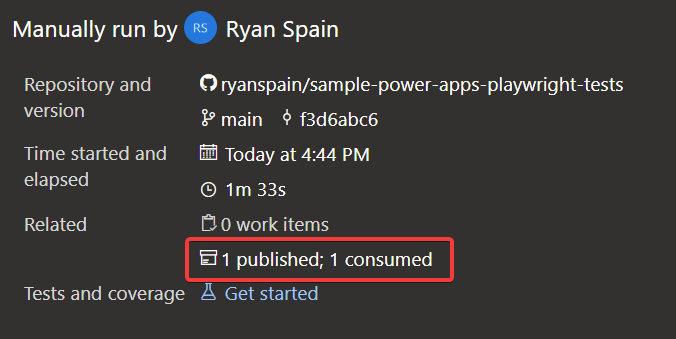
You can download the artifact and view the screenshots and videos for each test case you have authored.
👀 Show me the code
You can find all the source code used during this post in my GitHub repo here. Take note that the local.powerapps.config.js will be missing, but you can recreate it using the information in the repos readme.md or this post.
I hope you found this post helpful!